


Does your directory site have important news that visitors keep missing? You might have a huge Black Friday sale or a critical update, but it gets lost in the page design. Most site owners struggle to grab attention without ruining the look of their pages. This is where the WPgeoBuddy Announcement Bar plugin comes in to help.
This tool lets you put clear, bright notices right at the top or bottom of your site. It was built specifically for GeoDirectory users who need a way to push messages to the right people. Instead of a generic banner, you get a tool that knows exactly which page your visitor is on.
You can use it to drive more clicks to your listings or tell users about new features. The setup is simple, and the targeting is precise. Let’s look at how to get this working on your site.
Understanding the WPGeoBuddy Announcement Bar Plugin
The WPGeoBuddy Announcement Bar is a specialized tool created by the WPGeoBuddy team. They built it after seeing a need for better communication tools for their GeoDirectory clients. It isn’t just a static image; it’s a dynamic bar that you can change on the fly.
The main goal is to give you a way to display notices without writing code. You can tell people about sales, site maintenance, or new categories. You can find the plugin link in the project description to get started.
Installation and Activation
Getting the plugin live takes just a few minutes. You don’t need to be a developer to set it up.
- Download the plugin file to your computer.
- Go to your WordPress dashboard and click on Plugins.
- Choose “Add New” and upload the file.
- Click “Activate” to turn on the features.
Once you activate it, you will see a new menu item in your dashboard. This is where all the magic happens.
Core Functionality and Settings
After you activate the plugin, look for the “Geo Announcer” tab in your WordPress menu. This is your command canter. From here, you can create, edit, and delete as many announcements as you need.
Creating and Managing Announcements
You can build multiple announcements at once. This is great if you have different messages for different holidays or events. For example, you can set up a Black Friday bar in October and just keep it disabled until the right date.
To make a new one, click “Add Announcement.” You will see a field for an Admin Title. This title is only for you. It helps you keep track of which bar is which in the backend. Below that is the Description. This is the actual text your visitors will see on their screens.
Managing these is easy. You can toggle a switch to enable or disable any bar instantly. This means you can prep your marketing weeks in advance and flip the switch when it’s time.
Advanced Announcement Customization
A simple line of text is fine, but a button gets more clicks. The WPGeoBuddy Announcement Bar plugin lets you add a Call to Action (CTA) to any notice.
Call to Action (CTA) Button
When you edit an announcement, look for the CTA section. You can enter a short phrase like “Click Here” or “Get the Deal.” Then, you add the target URL. If you want people to visit developers.com, just paste that link in.
When the bar appears on your site, the button stands out. When a user clicks it, they go straight to your target page. This turns a passive notice into a lead generator for your directory.
Display Options and Scheduling
You have total control over when a message pops up. You can choose “Immediate” if you want it live right now. If you have a sale starting next Tuesday, use the scheduling tool to set a start and end time.
For the tech-savvy, there is a “Custom” option. This hides the bar by default. You can then use your own CSS or JS code to trigger the announcement. This is useful for complex sites that only want the bar to show after a user performs a specific action.
Animation and Positioning
You don’t want your notice to feel clunky. The plugin includes animation effects to make the bar slide or fade into view. This catches the eye without being annoying.
Positioning is also flexible. Most people put banners at the top of the page. However, you can move the bar to the bottom with one click. You can also choose if the bar is “sticky.” A sticky bar stays on the screen as the user scrolls down. A non-sticky bar disappears once the user moves past the header.
Designing and Controlling Announcement Visibility
The look of your bar should match your brand. You don’t want a neon green bar on a professional blue website.
Layout Options
In the layout tab, you can decide how the text and button sit together. The “same row” setting is the most common. It keeps the message and the CTA on one line to save vertical space. There are other layout options available depending on how much text you have.
Design and Styling
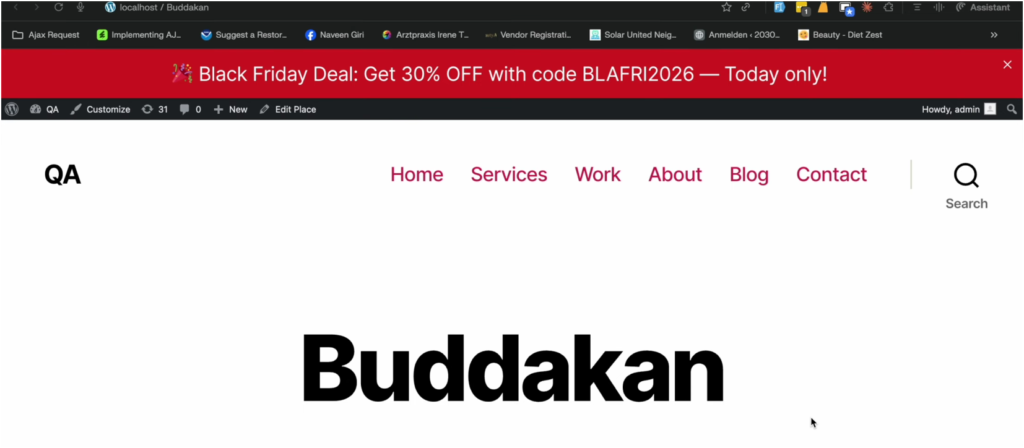
The design tab lets you change the color schema. You can pick a background color that pops. For a Black Friday sale, a bright red background works well. You can also change the text color to ensure it is easy to read.
Once you save these settings, the change happens instantly. Your visitors will see a professional, branded notice that fits your site’s aesthetic.
Close Conditions
Some users find announcement bars distracting. To keep your bounce rate low, you should enable the close button. This adds a small “X” to the corner of the bar.
When a visitor clicks the “X,” the bar vanishes. This gives the user control over their experience. It prevents them from feeling trapped by a banner that takes up too much screen space.
WPGeoBuddy Specific Targeting with Location Rules
This is the most powerful part of the WPGeoBuddy Announcement Bar plugin. Most banner plugins show the same message on every page. This is a waste. A user looking at “Events” doesn’t need a notice about “Hotel Listings.”
Granular Page Targeting
The Location Rule engine lets you pick exactly where a bar appears. You can choose to show it on all pages or hide it everywhere. But the real power is in the selected pages rule.
You can tell the plugin to only show a bar on the GeoDirectory archive page. You can get even more specific. For example, you can set it to show only in the “Event” section of the archive. If a user goes to the “Places” section, the bar disappears. This keeps your messaging relevant to what the user is actually looking for.
Custom Post Type (CPT) Specific Announcements
GeoDirectory sites often use different Custom Post Types. You might have one for “Restaurants” and another for “Plumbers.” You can create unique announcements for each CPT.
If you want to promote a discount for plumbers, you can target only the Plumber CPT. You can even add multiple conditions to one announcement. This level of detail ensures that your visitors only see information that matters to them.
WPGeoBuddy Services and Consultation
Building a directory site can be tough. If you struggle with GeoDirectory setup, you don’t have to do it alone. WPGeoBuddy provides professional development help.
They offer a 30-minute free consultation call. This is a great way to ask questions about your site’s structure or get advice on which plugins to use. You can find the booking link in their video descriptions.
Final Thoughts
The WPGeoBuddy Announcement Bar plugin is a smart addition to any GeoDirectory site. It moves beyond basic banners by offering deep targeting and easy customization. You can guide your users with CTAs, schedule your marketing, and target specific post types without touching a line of code.
By using location rules, you make sure your messages are relevant. This improves the user experience and helps you hit your business goals. Whether you are running a local city guide or a global niche directory, this tool helps you communicate better.
If you want to increase engagement and drive more action on your site, give this plugin a try. It’s a simple way to turn a quiet directory into an active communication hub.
Install the WPGeoBuddy Announcement Bar plugin today and start turning your directory traffic into real engagement.
📺 Watch the Full Video Tutorial: https://www.youtube.com/watch?v=M6r3npX6URo